成型工艺部分
Forming Process Section
Summary 概要
本课讲解紫砂陶器成型的基本操作标准,包括泥料湿度控制、打片速度、泥条制作、泥条划法及打身筒技术。重点强调规范操作,纠正自由主义操作法,并介绍不同造型所需的技术手段变化。
This lesson covers basic operational standards for Yixing pottery forming, including clay moisture control, slab beating speed, coil preparation, coil cutting methods, and cylinder beating techniques. It emphasizes standardized operations to correct free-form practices and introduces how technical methods vary according to different vessel shapes.
Key Concepts 关键概念
- clay moisture content (hardness and softness)
- beating speed and technique
- clay coil preparation and cutting
- body cylinder beating (da shen tong)
- plaster mold usage
- collaring technique (sha ao)
[Page 553]
=== Page 553 - Chinese ===
簿强求泪
四
八
第二课 成型工艺部分 1981.12.12
在现在的生产中 ,自由主义操作法 ( 随心所和欲 ) 是一种较为普遍的现
象, 这一课就讲一齐基本操作标准
1. 于湿度 : 也就是俗话所说的硬烂 ,央为泥料的干湿度还没有仪器去
测,, 暂时还只能靠感觉 。硬烂如何算正好,一般说来在打片子泥条时比较
爽 ,不粘搭只、泥怠 。在开料前,一定要先做好泥块的方头,开料要正好 ,
一般毛料比实际需要料大 1/4 就行了, 泥路丝的长度要开得和泥条的长度差
不多为好
2. 速度 : 打作料要讲究速度 ,打片子要会习惯使用一只手拿拱只, 要
求 10 厘米以内的片子一定要会用一只手拿搭上只打,泥片在 15 厘米以上的可
两只手握搭只匀平,小片子每分钟要求达到3~4块。
3,泥条 : 打泥条以左手为能,右手握搭只锤泥路丝,, 在手泥条时,月
力落点要均匀,要手得和泥条的要求厚度差不多时 ,再用搭只平整 。总之 ,
泥条的打薄不光靠用措只来平打 ,和否则出力不讨好 ,费时费工,打泥条要翻
身,翻身是为了纠正误差 ,有时为了纠正误差还要把泥条调头打 ( 这一般牵
涉到人坐的姿势、泥疑的高低,搭只的受力面等原因 )。
4. 泥条的划法及注意事项 : 划泥条的手势及拿法要正确 ,应该是划车
柄朝前,左手三指揪直尺 ,右手划动划车,泥条的光面朝泥帮,围泥条时光
面就在外档 ,因为泥条的分子密度在围身简时受到踊松,利于打身简,反之
翻来覆去 ,两面疏松不匀,打身简就不和 ; 在围泥条时,由于划车的规脚部
位的刀片比顶端部位的刀片略高 ,所以划车的外档部位要粘放在转盘处 ,这
[Page 554]
=== Page 554 - Chinese ===
要养成习惯 , 绝对不能本未倒置 ,
5. 打身简 : 打吴简是紫砂成型工艺中最高难的一种基本动作 ,打身简
时两手密切配合,但是又不是用两手
不能重一下、轻一下,速度既不能快
简可快些,大身简宜慢一些, 拍子既
上底满, 一般身简的底满要上在泥条
有意识地去帮助旋转 , 用力要均义,绝
也不能慢,要保持中速 ,相对来说小身
不要有意向上提或往下垂,身简打好后
里面 .切不要底满泥条分不清界限 ,胡
缠在一起,和矩车旋底满时注意把光面 ( 即用泥钙只夹光的一面 ) 安放在靠
转盘处,旋好后翻过来上 ,也就是光
下 ), 达到里紧外松的效果 ,
现在全手工成型少了,一般都采
讲究打身简, 在放进石膏模时 ,要有
为足一足而已 。 现在普遍有这样的反
们自己来检验,不对的地方要自己能
要模型凸出来,使之利于修环 . 脱坏
由于我们紫砂产品的造型很多 ,
采取的技术手段也随之变异
例如下图1、2 两个造型 ,
面朝外 ( 或者说规脚小眼朝上、大眼在
用石膏模撕坏 ,就是用石膏模挤坏也要
一个好的和难形 ,这样在扩坏时 ,只要略
映,抱她模型不好 ,模型的合格要靠我
检修 ,检修模型时宁可模型四一些,不
以后,要养成马上挟模型结头的习避 。
千变万化,因此在生产时随工艺要求 ,
图 1 颈部较矮,采
用上大只、履滋泥的手段 ( 箭头指处 ) 处理 ; 图 2 颈部较高〈 箭头指处 ),
不可能采用上大只 、歼滋泥的办法 ,
只能采用一种我们叫作剩凹的手段来处
理, 采用刹四的手段 ,首先需要将身简打如图 3, 然后在箭头指处进行刹凸,
勒成图 2。
2 3
五
九
[Page 553]
# Yixing Pottery Manufacturing Techniques
## Lesson Two: Forming Process Section (December 12, 1981)
In current production, the practice of free-form operation (following one's whims) is a relatively common phenomenon. This lesson will cover the basic operational standards.
1. **Moisture content**: This refers to what is colloquially called "hardness and softness." Since there are no instruments yet to measure the moisture level of clay, we must rely on feel for the time being. How to determine the proper hardness and softness? Generally speaking, when beating clay slabs and coils, it should feel crisp, not sticking to the paddle or clay board. Before opening the clay, one must first prepare the square edges of the clay block. The opening should be just right—generally, the rough material should be about 1/4 larger than what is actually needed. The length of the clay strips should be cut approximately the same as the length of the clay coils.
2. **Speed**: Working the clay requires attention to speed. When beating slabs, one should develop the habit of using one hand to hold the paddle. For slabs within 10 centimeters, one must be able to beat them holding the paddle with one hand. For clay slabs over 15 centimeters, both hands may be used to grip the paddle and flatten evenly. For small slabs, the requirement is to achieve 3-4 pieces per minute.
3. **Clay coils**: When beating clay coils, the left hand should be capable, with the right hand gripping the paddle to beat the clay strips. When beating clay coils, the force should land evenly. Beat until it approaches the required thickness of the coil, then use the paddle to smooth it. In short, thinning clay coils does not rely solely on flat beating with the paddle—otherwise, the effort yields poor results, wasting time and labor. Clay coils must be turned over; turning is done to correct errors. Sometimes, to correct errors, the coil must be reversed end-to-end for beating (this generally relates to factors such as one's sitting posture, the height of the clay board, and the bearing surface of the paddle).
4. **Method of cutting clay coils and precautions**: The hand position and grip for cutting clay coils must be correct. The cutting tool handle should face forward, with the left hand's three fingers holding the straight ruler, and the right hand moving the cutting tool. The smooth side of the clay coil should face the clay board; when wrapping the coil, the smooth side will be on the outside. This is because the molecular density of the clay coil becomes loosened when forming the cylinder body, which facilitates beating the cylinder. Conversely, if turned back and forth with uneven loosening on both sides, the cylinder beating will not be harmonious. When wrapping the clay coil, since the blade at the base of the cutting tool's gauge is slightly higher than the blade at the top, the outer gauge portion of the cutting tool should be placed against the turntable.
[Page 554]
# Developing Proper Habits in Yixing Pottery Technique
It is essential to develop proper habits and absolutely avoid putting the cart before the horse.
## 5. Beating the Body Cylinder
Beating the body cylinder (*da shen tong*) is one of the most difficult fundamental techniques in Yixing clay forming. When beating the body cylinder, both hands must work in close coordination, but they should not deliberately assist in rotation. The force applied must be even and consistent—absolutely not heavy one moment and light the next. The speed should neither be too fast nor too slow, but maintained at a moderate pace. Relatively speaking, small body cylinders can be worked faster, while large body cylinders should be worked more slowly. The paddle should not intentionally lift upward or press downward. After the body cylinder is properly beaten, the bottom coil should be attached. Generally, the bottom coil of a body cylinder should be attached to the inside of the clay strip. Take care that the boundary between the bottom coil and clay strip remains distinct—they must not become muddled together and entangled. When wheel-throwing the bottom coil, pay attention to placing the smooth surface (that is, the side smoothed with the clay rib) against the wheel. After throwing, flip it over to attach, so that the smooth surface faces outward (or in other words, the small eye of the foot rim faces up and the large eye faces down), achieving the effect of tight on the inside and loose on the outside.
Nowadays, fully handmade forming has become less common. Generally, plaster molds are used for pressing or squeezing the clay. Even when using plaster molds to squeeze the form, attention must be paid to beating the body cylinder. When placing it into the plaster mold, one must have a good sense of the difficult shape, so that when expanding the form, only slight adjustments are needed—merely adequate and nothing more. Currently, there is a widespread reaction that the mold quality is poor. The qualification of molds must be verified by ourselves, and any incorrect areas must be corrected by ourselves. When inspecting and repairing molds, it is better for the mold to be slightly concave rather than protruding, as this facilitates trimming. After demolding, one should develop the habit of immediately trimming the mold seam lines.
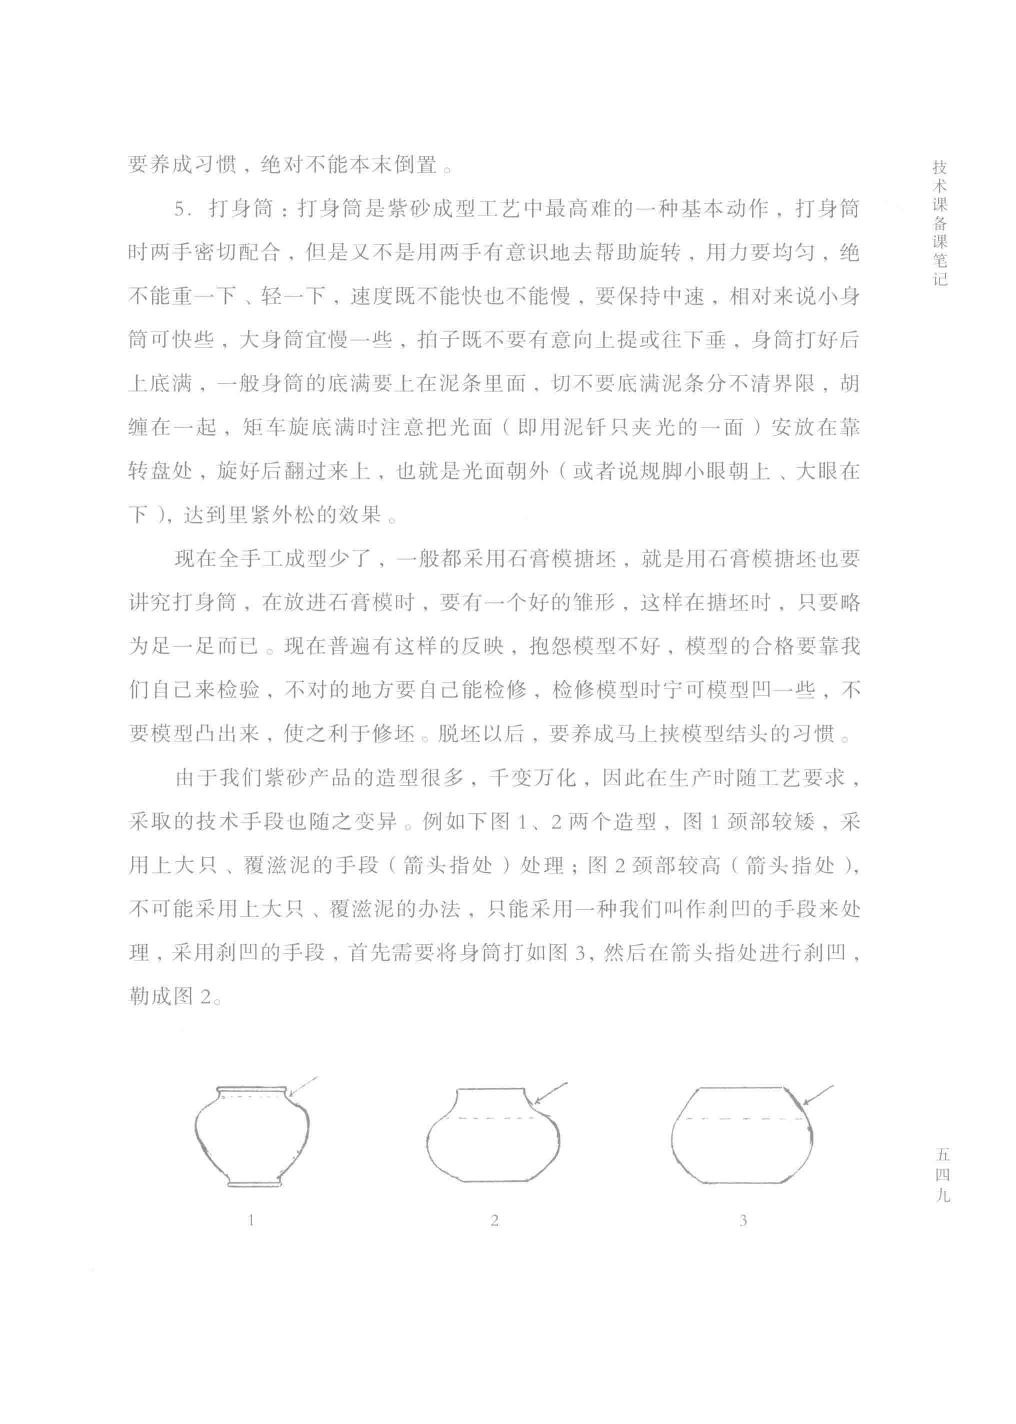
Because our Yixing pottery products have countless variations in form, the technical methods employed in production change accordingly with the craft requirements.
For example, consider the two forms shown in Figures 1 and 2 below:
Figure 1 has a relatively short neck, which is handled by applying a large rib and adding slip (indicated by the arrow). Figure 2 has a relatively tall neck (indicated by the arrow), where it is impossible to use the method of applying a large rib and adding slip. Instead, one must employ a technique we call "collaring inward" (*sha ao*) to handle it. To use the collaring technique, one must first beat the body cylinder as shown in Figure 3, then perform the collaring at the location indicated by the arrow, shaping it into Figure 2.
[Figures 2 and 3 referenced in text]
---
*Page 59*