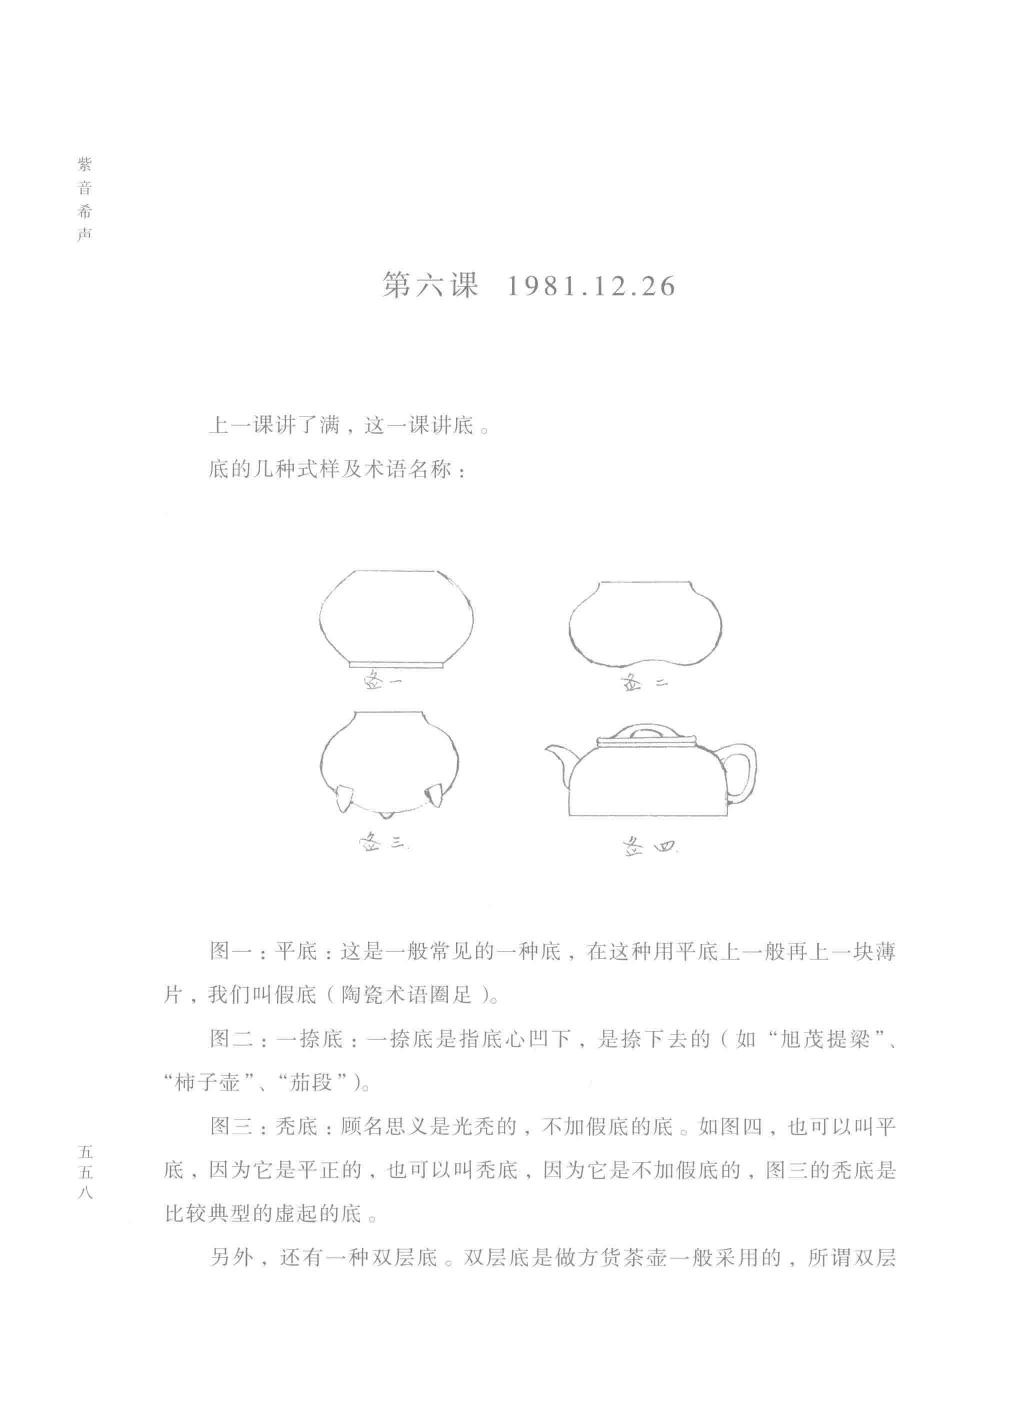
底的几种式样及术语名称
Types of Bases and Their Technical Terminology
Summary 概要
本课讲解紫砂壶底部的各种类型(平底、一捧底、秃底、双层底)及其制作技术要点,包括假底的作用和处理方法。同时详细介绍了三大类盖头(压盖、嵌盖、截盖)的特点和操作注意事项,以及线条处理的工具要求和技术细节。
This lesson covers various types of teapot bases (flat base, recessed base, bare base, double-layer base) and their technical construction methods, including the function and treatment of false bottoms. It also provides detailed explanations of three major lid categories (pressing lid, inset lid, cut lid) with their characteristics and operational precautions, plus tool requirements and technical details for line refinement.
Key Concepts 关键概念
- 平底/Flat Base
- 一捧底/Recessed Base
- 秃底/Bare Base
- 双层底/Double-Layer Base
- 假底/False Bottom
- 压盖/Pressing Lid
- 嵌盖/Inset Lid
- 截盖/Cut Lid
- 云肩线/Cloud-Shoulder Lines
- 底片安装技术/Base Installation Techniques
[Page 563]
=== Page 563 - Chinese ===
缉 或 泪
到
第六课 1981.12.26
一课讲了满,这一课讲底 。
底的几种式样及术语名称 :
AN
本汪ee
图一 : 平底 : 这是一般常见的一种底,在这种用平底上一般再上一块溥
片,我们叫假底 ( 陶瓷术语圈
: 一捧底 : 一捧底是指底心目下,是撩下去的(如“旭藏提梁”、
“柿子索”、“茄段”)。
节
图三 : 秃底 : 顾名思义是光秃的,不加假底的底 。如图四,也可以叫平
五
五 底 . 因为它是平正的, 也可以叫秃底,因为它是不加假底的,图三的秃底是
八
比较典型的虚起的底 。
另外, 还有一种双层底 。 双层底是做方货茶过一般采用的 ,所谓双
尖
[Page 564]
=== Page 564 - Chinese ===
底就是先把一层假底、一层底片合在一起裁 , 然后上到泥条里面 , “小
方钟" 水平。】
本
第二课已经讲过,这里再强调一遍 : 上底片一定要把底片上在泥条里
面, 底片周围的泥条要求均匀 ,切不可把泥条当底片、底片做泥条 ,混杂趟
清 。上底片不管是平底、一撩底、秃底都要光面朝上 。
(二 ) 一捧底注意事项 :
在身简的下脱 (下半部位 ) 打好后 ,就只要把尺寸大小正好的虚片上
上去就好了 , 上一捧底 ,底片一虚好就要上 ,上好虚片在顶部用拍子轻轻拍
一下 。 此时,由于顶部受力, 虚片的边缘部位向外略有扩张,马上就用鱼钱
刀在扩张的部位挟一圈 ,然后用手底工具手底心 ,此时虚底的边缘部位又有
扩张 ,这时宜用拍子拍齐、挟和 , 这样这块底片由于反复受力 ,比较坚实 ,
翻过身来就不会塌了
(三 ) 双层底的注意事项 :
双层底一般用于方货,方货上底满,为了防止满脱口 ,一般是先上满 ,
刮汶泥。上双层底时不要把底片挟到泥条下面去 ,要使底略高于泥条一点
要使底和泥条在角落上相交接 , 这样才会上得紧, 一上好底就必须抓紧时间
拍好角落,不要等硬了再做,因为一硬就不好处理了 。
(四 ) 假底、大只 :
假底是指在底片上加起的一块泥片,假底的处理大体上归纳为上假底和
挟假底二种 。上假底又有明 、瞳二种 。 大只是指在满上面加起来的泥片,我
们一般就把茶壶上部的叫大只,底部的叫假底 。
假底起到两个作用 : 一、工艺结构上的必要 弥合泥条与底结合部
的缝隙 ; 属于工艺上的必要手段 一一避免不必要的损坏〈 特别是半成品 )。
二、起到丰富器型的作用 。( 全国陶次行业统一的术语名称 : DT 叫拓
口,假底叫圈足 。)
二
邢
豆贬王求殉访藻
半册上册
[Page 565]
=== Page 565 - Chinese ===
上E 一 E= = 一 一
aa -一
】 [ | ) |
SS 愉 、 /
下二一一际 NE
1 2 3
、 了
TAU 一 TY 何
[- ) 多
| 加
4 5
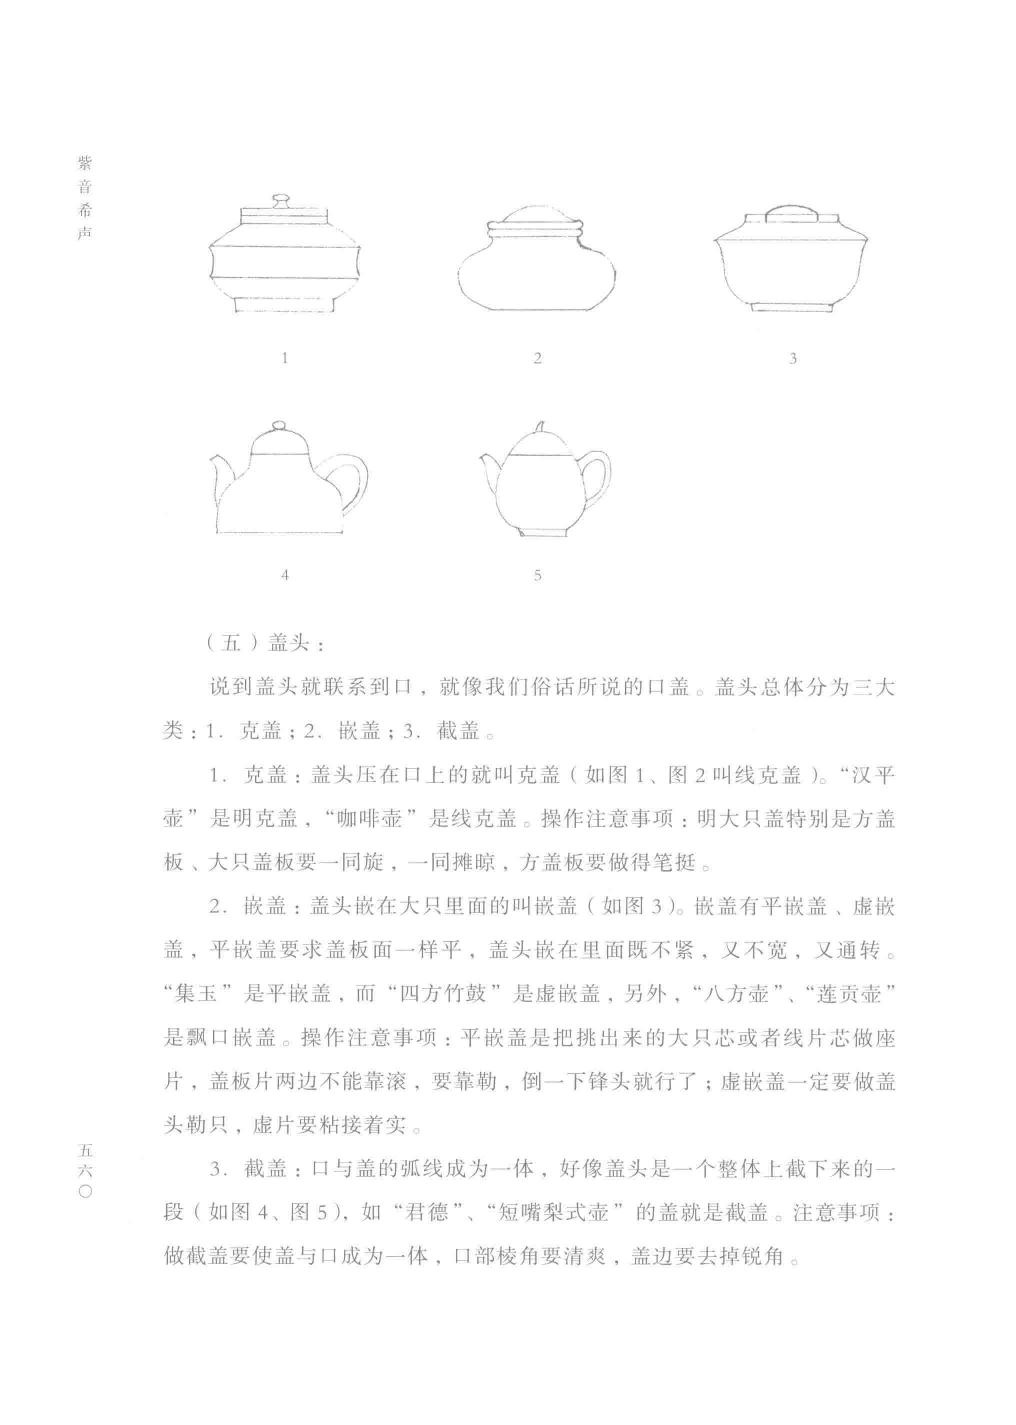
(五 ) 盖头 ;
说到盖头就联系到口 ,就像我们俗话所说的口盖 。盖头总体分为三大
类 : 1. 克盖 ; 2、舱盖 ; 3. 鹤盖 。
1, 克盖 : 盖头压在日上的就叫克盖 (如图1、图2叫线克盖 )“汉平
壶”是明克盖 ,“咖啡霉”是线克盖 - 操作注意事项 : 明大只盖特别是方盖
板、大只盖板要一同旋, 一同摊晾,方盖板要做得笔挺 。
2. 议盖 : 盖头嵌在大只里面的叫嵌盖 (如图 3 )。内盖有平仍盖 、虚贼
盖,平从盖要求盖板面一样平 ,盖头藤在里面既不紧,又不宽 ,又通转 。
“集玉”是平伐盖,而“四方竹鼓”是虚嵌盖 , 另外 ,“八方过”、“茵贡壹
是球口典盖 。 操作注意事项 : 平嵌盖是把挑出来的大只芯或者线片芯做座
片 ,盖板片两边不能靠滚 ,要靠勒,倒一下锋头就行了 ; 虚嵌盖一定要做盖
头勒上只, 虚片要粘接着实 。
3. 截盖 : 口与盖的狐线成为一体 , 好像盖头是一个整体上截下来的一
口汶出
段(如图4、图5),
如“和君德”
、“短嘴梨式过”的盖就是截盖 。
注意寻
做截盖要使盖与口成为一体,口部棱角要清爽 ,盖边要去掉锐角 。
此项 :
[Page 566]
=== Page 566 - Chinese ===
] 帮
总- 坟=
莹一 学二 毕三
二一天一
多浸 |
喉忆
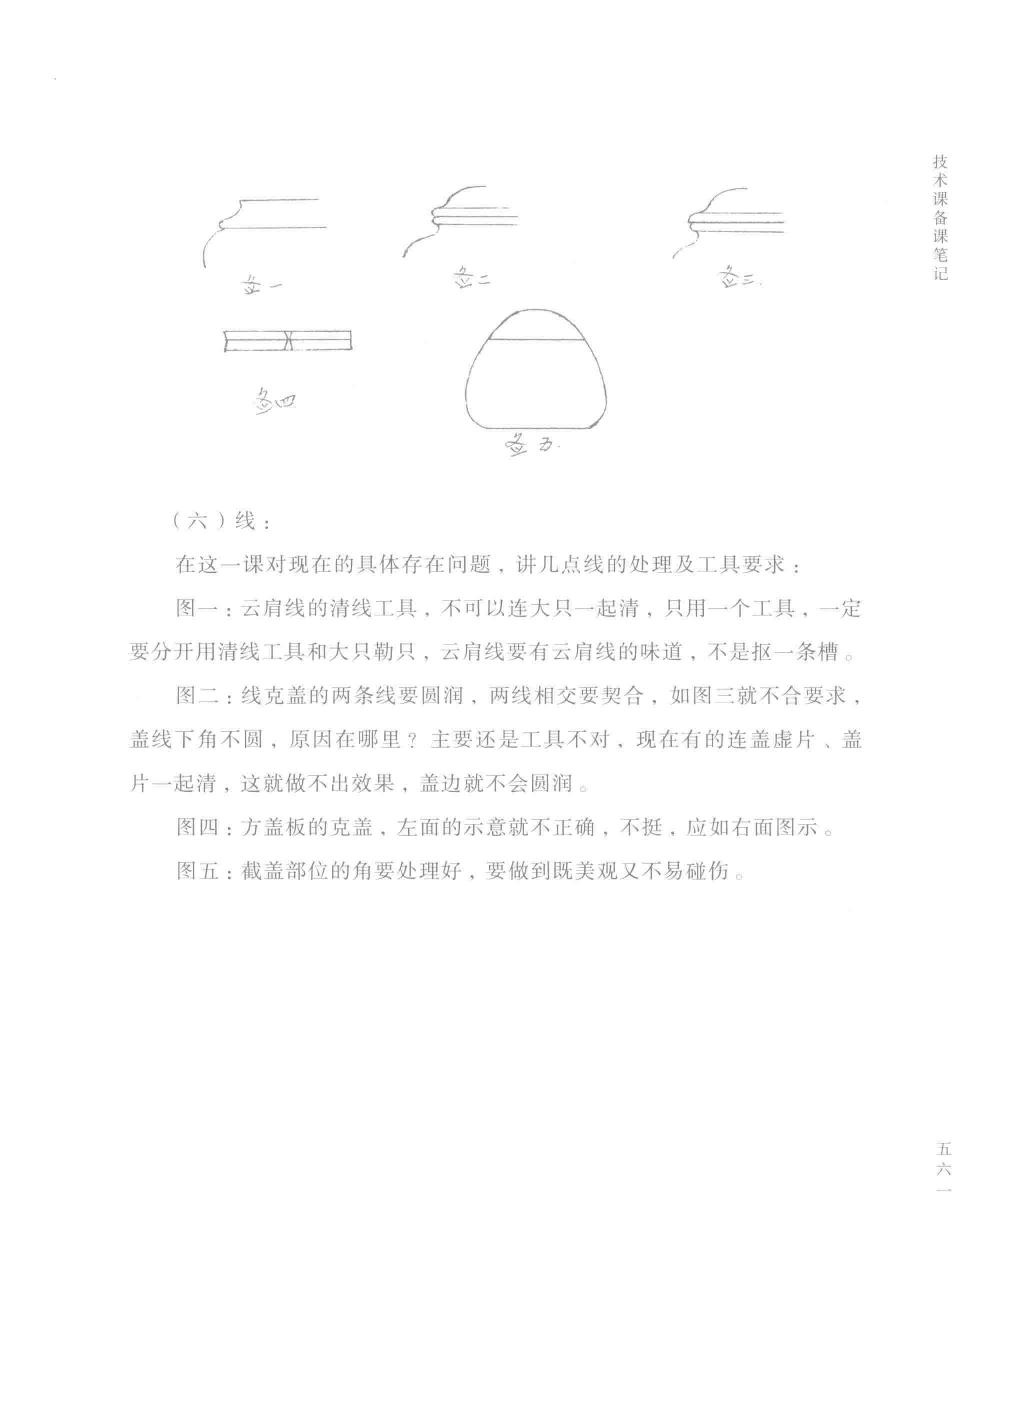
(六 )线:
在这一课对现在的具体存在问题 ,讲几点线的处理及工具要求 :
图一 : 云肩线的清线工具, 不可以连大只一起清,只用一个工具, 一定
要分开用清线工具和大只勒只, 云肩线要有云肩线的味道 ,不是抠一条模 。
图二 :
盖线下角
片一起清
图四
网五
线克盖的两条线要圆润 , 两线相交要契合,如图三就不合要求 ,
不圆,原因在哪里? 主要还是工具不对,现在有的连盖虚片 、盖
,这就做不出效果 ,盖边就不会圆润 。
: 方盖板的克盖, 左面的示意就不正确,不挺, 应如右面网示 。
: 截盖部位的角要处理好 , 要做到既美观又不易碰伤 。
吾明缆或纸六过
[Page 563]
# Lesson Six, December 26, 1981
The previous lesson covered the lid; this lesson covers the base.
Several types of bases and their technical terminology:
**Figure 1: Flat Base** - This is the most commonly seen type of base. On this flat base, a thin clay slab is typically added on top, which we call a false bottom (ceramic terminology: added bottom).
**Figure 2: Recessed Base** - A recessed base refers to a base where the center is sunken inward (as in the "Xu Zang Tiliang," "Persimmon," and "Eggplant Segment" styles).
**Figure 3: Bare Base** - As the name suggests, this is a bare base without an added false bottom. As shown in Figure 4, it can also be called a flat base because it is level and flat, or it can be called a bare base because no false bottom is added. The bare base in Figure 3 is a relatively typical raised base.
Additionally, there is another type called the double-layer base. The double-layer base is generally used when making square-shaped teapots. The so-called double...
[Note: The text appears to be incomplete at the end]
[Page 564]
# Bottom Installation Techniques
The bottom is made by first cutting a false bottom and a bottom piece together, then attaching them inside the clay coil, maintaining the "small square bell" level.
As already explained in the second lesson, I emphasize again: when attaching the bottom piece, you must place it inside the clay coil. The clay coil around the bottom piece must be uniform. Never confuse the clay coil with the bottom piece or use the bottom piece as a clay coil—keep them clearly distinguished. When attaching the bottom piece, whether it's a flat bottom, single-layer bottom, or bare bottom, the smooth side must face upward.
## (II) Precautions for Single-Layer Bottom:
After the lower section (lower half) of the body cylinder is completed, you simply need to attach a bottom piece of the correct size. When attaching a single-layer bottom, the bottom piece should be attached as soon as it's ready. After attaching the bottom piece, gently tap the top with a paddle. At this point, due to the force applied at the top, the edge of the bottom piece will expand slightly outward. Immediately use a fish-tail knife to trim around the expanded area, then use the hand-bottom tool to work the bottom center. At this time, the edge of the bottom will expand again. Use the paddle to tap it flat and trim it. Through this repeated application of force, the bottom piece becomes quite solid and won't collapse when turned over.
## (III) Precautions for Double-Layer Bottom:
Double-layer bottoms are generally used for square-shaped wares. When attaching the bottom to square wares, to prevent the rim from detaching, the general practice is to attach the rim first and scrape away excess clay. When attaching a double-layer bottom, don't press the bottom piece under the clay coil—the bottom should be slightly higher than the clay coil and should meet the clay coil at the corners. This ensures a tight attachment. As soon as the bottom is attached, you must work quickly to tap the corners properly. Don't wait until it hardens, because once it hardens, it becomes difficult to work with.
## (IV) False Bottom and Top Section:
A false bottom refers to a clay piece added onto the bottom piece. The treatment of false bottoms can be broadly categorized into two types: attaching the false bottom and trimming the false bottom. Attaching false bottoms can be further divided into visible and concealed types. The top section refers to the clay piece added on top of the rim. We generally call the upper part of a teapot the "top section" and the lower part the "false bottom."
The false bottom serves two purposes: First, it's a structural necessity in the craftsmanship—it bridges the gap between the clay coil and the bottom joint; it's an essential technical measure to avoid unnecessary damage (especially to semi-finished products). Second, it enriches the form of the vessel. (According to the unified terminology of the national ceramics industry: the top section is called the "flared rim," and the false bottom is called the "foot ring.")
---
[Note: The final line appears to be a header or title fragment that may be part of a larger document structure]
[Page 565]
# Lid Types
When discussing lids, we naturally think of the mouth of the teapot, as the common saying goes "mouth and lid." Lids can be broadly divided into three major categories: 1.压盖 (Ya Gai/Pressing Lid); 2. 嵌盖 (Qian Gai/Inset Lid); 3. 截盖 (Jie Gai/Cut Lid).
## 1. 压盖 (Ya Gai/Pressing Lid)
A lid that presses down on the mouth is called a 压盖 (as shown in Figures 1 and 2, called 线压盖/Line Pressing Lid). The "Han Ping Hu" uses a 明压盖 (Ming Ya Gai/Plain Pressing Lid), while the "Coffee Mold" uses a 线压盖 (Xian Ya Gai/Line Pressing Lid).
**Operating precautions:** Plain pressing lids, especially square lid plates and large lid plates, must be thrown and dried together. Square lid plates must be made perfectly straight.
## 2. 嵌盖 (Qian Gai/Inset Lid)
A lid that is inset inside the mouth is called an 嵌盖 (as shown in Figure 3). Inset lids include 平嵌盖 (Ping Qian Gai/Flat Inset Lid) and 虚嵌盖 (Xu Qian Gai/Hollow Inset Lid). A flat inset lid requires the lid plate surface to be equally flat, with the lid fitting inside neither too tight nor too loose, and rotating smoothly. "Ji Yu" uses a flat inset lid, while "Si Fang Zhu Gu" (Square Bamboo Drum) uses a hollow inset lid. Additionally, "Ba Fang Guo" and "Yin Gong" use ball-mouth inset lids.
**Operating precautions:** For flat inset lids, use the extracted body core or line core as the base piece. The two sides of the lid plate cannot rely on rolling but must rely on trimming—just chamfer the edge slightly. For hollow inset lids, the lid must be made to fit onto the body, and the hollow piece must be firmly attached.
## 3. 截盖 (Jie Gai/Cut Lid)
The arc line of the mouth and lid form a unified whole, as if the lid were a section cut from an integral piece (as shown in Figures 4 and 5). Examples include "He Jun De" and "Duan Zui Li Shi Guo" (Short-Spout Pear-Style Teapot), which use cut lids.
**Operating precautions:** When making cut lids, ensure the lid and mouth form a unified whole. The edges and corners of the mouth should be crisp and clean, and sharp angles on the lid edge should be removed.
[Page 566]
# Lines
In this lesson, regarding current practical problems, I'll discuss several points about line treatment and tool requirements:
**Figure 1:** The tool for refining cloud-shoulder lines must not be used together with the large rib tool. Only one tool at a time. You must use separate tools for refining lines and for the large rib work. Cloud-shoulder lines should have the character of cloud-shoulder lines, not just carving out a groove.
**Figure 2:** The corner below the lid line should not be refined all together with the flange.
**Figure 3:** The two lines where the lid meets the body must be smooth and rounded, and where the two lines intersect they must fit together properly. Figure 3 does not meet requirements—it's not rounded. What's the reason? Mainly it's still a tool problem. Nowadays some people refine the lid flange and lid together, which cannot produce the desired effect, and the lid edge will not be smooth and rounded.
**Figure 4:** For the lid-body junction of a square lid plate, the diagram on the left is incorrect—it's not straight. It should be as shown in the diagram on the right.
**Figure 5:** The corners at the lid junction must be handled well, achieving both aesthetic appeal and resistance to damage.